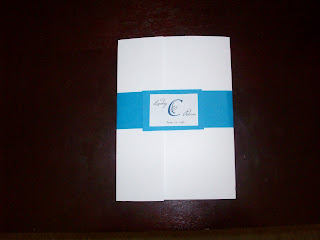
Attempt #2:
So after my last attempt, I decided I should try to get more appropriate colors and actual inserts to see more of the desired product. I still hadn't upgraded to a paper cutter, scoring blade or better glue. I'm sad to see some of the info blurred out so you don't get the entire "package," but I am much happier with this version.
What I learned:
Adding the invitation and the inserts to the pocket-fold really tied it together and made it seem a little more official and uniform. The non-neon colors helped too (although the blue isn't quite right yet).
I'm not completely satisfied with the look of the main invite. I feel like it is kind of bland. I was going for a simple look, but I think there is a definite line between those two. I would like to emboss something on the invite to give it some texture (so I am thinking to find a rubber stamp of the flourish).
I printed out our logo to put on the belly band, although I think the band needs to be thinner so its not the same thickness as the logo.
Grade: B
While the colors are not the ones I actually want, I think this was a big improvement on Attempt #1. I made the right flap smaller so that it folds together nicely and I would feel okay about sending this out (although its definitely not perfect).


Your invites are really coming along. How many are you going to make? You've got much more patience that me, I could never deal with this much planning and preparation. Well done! x
ReplyDeleteThank you! We will probably have about 60-70 to send out, but I think it will go a lot faster once I get the kinks worked out. Since I have summers off (and my FH usually works full time then) this will not only keep me from being bored, but it also will keep me out of the stores buying clothes!
Delete